Set and adjust permissions to limit what users can do under specific schools or departments.
After you have imported or created user accounts in SchoolNow, you will want to set their permissions in order to limit what they can do under a specific school or department. It's best to have a good understanding of permissions, roles and groups before establishing user access so that you can most easily streamline how you manage your users access.
Before you apply specific permissions to a user, determine if you will be applying the same permissions to multiple users. In that case, it's best to create a permissions group and then make all the users a member of that group. That way, if you need to make changes, you can make changes to the group and all its members will be affected.
Default Roles
Here are the recommended default roles that should be set up for your school. If you need help with this, that's what we're here for! Just reach out to our help desk.
Messaging
- Full access - allows user to send both Urgent and General notifications
- General only - allows user to send only General notifications
Website
- Admin - full access to everything CMS-related (including templates)
- Publisher - allows user to edit and publish on school/district-specific sites
- Teacher - allows user to edit and publish on a specific teacher site
Let's look at two examples of how you can apply permissions to a user.
Example 1: Apply permissions directly to user
Below, we are editing an individual users "Permissions" tab where we will assign specific permissions only to that user account. We want this person to be a communicator and web publisher under Maddux Elementary School. Under Messages, we have added Maddux Elementary and we have applied the "Full Access" role so that she has all the proper permissions applied to that role. Under Website, we have added access to Maddux Elementary using the "Admin" role so that she is granted all the permissions applied to that role.
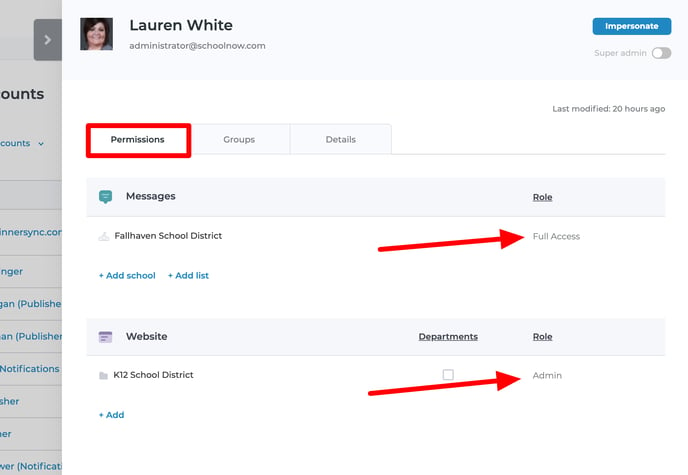
We can grant additional access to schools, departments and lists by clicking the +Add links under the proper category and assigning the proper pre-defined roles. If you need a new role with more custom permissions, first create that role, then come back to a users account to assign them using the new role.
Example 2: Apply permissions by making user a member of a group
Below, instead of using the Permissions tab to apply permissions directly to the user, we're using the "Groups" tab to make the user a member of a permissions group. Without having anything else defined under the Permissions tab, we can simply make this user a member of one or more permission groups to grant all the permissions to the defined schools and departments in each group.
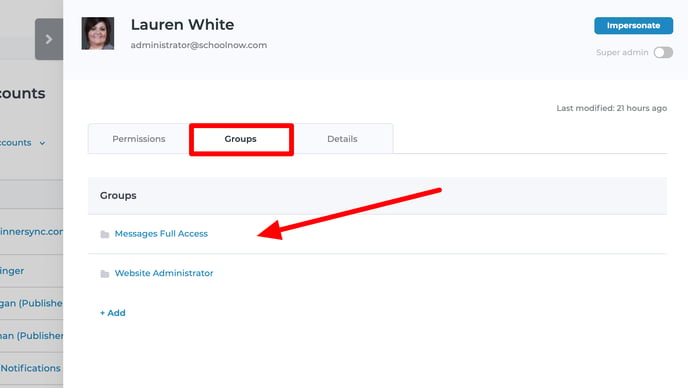
We can make the user a member of unlimited permission groups by clicking the +Add link and selecting a pre-defined group. If you need a new group with custom permissions or roles applied to it, first create that group, then make the user a member of that group.
Note: Notice the "Super admin" toggle and "Impersonate" buttons at top-right. These functions are available and only show to Super admins.
When you toggle a user account to Super admin, they have unbridled access across your website.
The Impersonate button is used to temporarily impersonate a user to check the permissions you have set for them. A Super admin can jump in and out of impersonating any other user account.
In sum, be very selective of who you give Super admin access!