This article will instruct you in preparing a data import sheet to import news articles into SchoolNow
Typically, customers manually enter news releases directly into their website or hand-populate our supplied template below. If using an import sheet, the data within will need to be put into the proper format before it can be imported into SchoolNow.
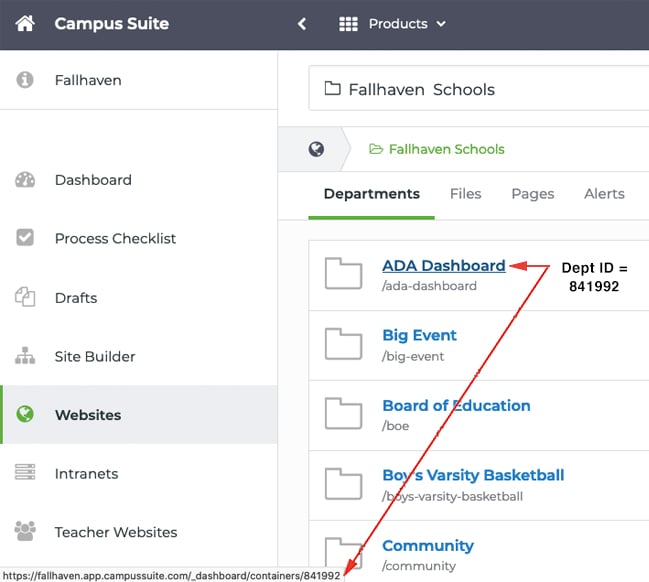
Download the v3 News Import Template (a Google spreadsheet) and use it to populate your news articles before bulk importing. The only required fields for news data imports are the title, the timestamp, and the department ID. The department ID is the ID of the department within your new website that you want the news imported into. You can find the ID to any department by logging in to your dashboard, going to Sites and Departments, and rolling over the desired department. Look down at the bottom-left tray in your browser to see the ID as part of the URL. See the screenshot at right (Click for larger view)
Preparing the import sheet
Now that you have a populated sheet with all your data let's review the columns and any needed special formatting.
- Owning Department ID - Required - ID of the department that should receive the news article. You can find the Department ID of a department by taking your cursor over the department's title in the department list view and recording the series of numbers after the last forward-slash (shown above).
- Friendly Dept Name - Optional - Since you can import news into multiple departments on the same sheet, this field helps you identify the department whose ID is in the Owning Department ID column.
- Shared Depts - Optional -The IDs of any other departments this article should be shared with, separated by a pipe |.
- Title - Required - The name of your news article.
- Timestamp - Required - The date of your news article. Time is typically not needed, but you can add it if you have one. This date should be the date the article appears(ed) on your site. This field requires special formatting described below.
- Image - Optional - but strongly recommended. News articles look best when they have an associated image. For best results, images should be landscape/horizontal in format and have a good resolution quality. SchoolNow handles optimizing the images for you. You need to upload the images into a directory on your website and specify the directory ID in front of the filename if you want to import news releases with an image. More on that below.
-
Caption - Optional - A caption for the associated image.
- Tags - Optional - You can tag your news articles, so they come directly in already tagged. Note: The tag(s) must be added to your site via the tag manager before the import sheet will process.
- Abstract - Optional - This is a brief description of your news article. The abstract text shows out on the listing views and in widgets before the news article is clicked on.
- Content - Optional - The body text of your news article.
Uploading images and editing your import sheet
The Image field must start with the ID of the directory/folder that you have uploaded your images into. The directory could be anywhere. We suggest going into your root /images folder and creating a new folder named "news-import," then uploading your images into this folder. Now, grab the ID of that folder. Place it in front of the image filename in your import sheet. Separate it with a forward slash. Here is an example of how the data should look in the Image field within your import sheet. ID/Filename.jpg, or 806452/filename.jpg. The ID tells the importer where to find the file that goes with the news release.
Formatting the News article timestamp
The Timestamp field must be formatted properly before your import sheet will process. Here is how to do it. Note, these instructions are for users using Google sheets. If you are using Microsoft Excel, you can accomplish the same functions, but the directions will differ.
- News article dates must be formatted in a single column using the following format "YYYY-MM-DD HH:MM:SS" - See an example in the template linked above. Notice there is a Timestamp field.
- Once the sheet is ready for import, rename the column name for the timestamp. Add something like "ORIGINAL" after the column name header and then make a copy of the column (basically, we are making a back-up of the column because we will be altering the formatting and permanently changing the data. It may be wise to have the original data to come back to if needed.)
- Now that you've made a new "Timestamp" column, copy the following formula, and paste it into line 1 of the proper column (it's OK to paste this in the column header) =TEXT(A1, "yyyy-mm-dd hh:mm:ss.0") to populate the columns (the cell A1 should be changed to whatever the appropriate original column is.)
- Click/drag to fill this formula down each column
- Select the entire column
- Copy the column content (it is OK to get the column name in there too)
- Right-click on the column selection, choose "Paste Special" and then "Paste values only"
- Then, with the column still selected, choose the top menu "Format", then "Number", then "Plain Text"
Having all the other data in the sheet ready, the sheet will now import.
How do I import data for News articles?
- After logging into your site, click Settings, the gear located in the top navigation bar, followed by System Settings in the left navigation on the next screen.
- Click on Imports followed by the Import button at the top-right of the screen, then select News as the import type.
- On the following screen, enter the name of the import, which is just a name that is friendly to you. This is not shown to the public. You can also add an optional description. Then if you like click, on the switch to the right of Indexed to allow for the syncing up of events with any future imports, and finally click Create.
- You'll now see your import ready to manage. Click the three vertical dots to the right of the job and select Upload New Sheet to upload your import sheet. Browse to select your sheet, and click Save.
- With your sheet now uploaded, click the three vertical dots again to the right of the job and select Mappings from the options given. This is simply telling SchoolNow what columns to find your data in. If you used the import sheet, we provided above. These mappings should automatically line up. If they don't, simply interact with each of the pull-down menus to specify which column in your sheet should be used to pull that data into the proper column in SchoolNow (the field names at left). Once done, click Save.
It's OK to leave fields blank, but remember, the department ID, title, and timestamp are required. Once done, click Save.
- Now click the three vertical dots to the right of the job one last time and select Process Import from the options given, select Test, and if there are no errors, select Process. If there are any problems, SchoolNow will tell you. If it successfully imports, you will be taken back to the import jobs screen and see your job now is labeled Processed (also Updatable if the index switch was clicked).
Congratulations, you can now go to your departments and find all your news.
